Sojourn
iOS app that manages trip itineraries.
A trip consists of multiple days and
each day consists of multiple events.
The available events are:
- Flight
- Rental car
- Car suttle/ride share
- Train
- Lodging
- Activity
Sojourn maintains the trip info
in application storage on the
iOS device.
This internal data can
be saved to a JSON formatted
file that can then
be shared with other versions
(Android, Garmin watch)
of the Sojourn app.
Sojourn is licensed under the GPL V3.0.
The latest source tree is available
for browsing
here
and tarballs for the latest and older versions are located at the following links:
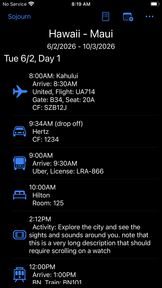
Main display
The main
(well, really, the only) screen shows
(from top to bottom):
- The action bar
- The title for the trip with first and last dates of the trip
- Day of week and trip day for the current day
- Events for the current day
Action bar
The action bar has 3 icons
on the right side:
 Add a new event to the currently selected day.
 Add a new day to the trip.
 Bring up a list of other actions
Title for the trip
The title for the trip (in this case Hawaii - Maui). Tapping on
this title brings up a popup that can change global information
about the trip:
- Where to - editable field that changes the name of the trip.
- Date format - drop down that allows the user to select
how dates are formated:1
- M/d/yyyy - Month followed by day of month followed by year.
This is the default format.
- d/M/yyyy - Day of month followed by month followed by year.
- yyyy/M/d - Year followed by month followed by day of month.
Day of week
Show the day of week for the current day.
Also shows how many days into the total
trip for the current day.
Event details for the current day
Events for the currently selected day from the day tab. Swiping
left or right scrolls through the days of the trip.
Each event has at least one line with an icon
identifying the type of event,
the start time for the event,
and optionally some other info.
Following the first line there are
other optional lines giving more details
on the event.
Note that every field for
an event except the type
is optional,
it's OK to leave everything blank
(although you really should specify
the start time,
othewise all of the events
will bunch up at midnight).
Also note that every event has
a CF
(ConFirmation number)
that will only be displayed if
it is non-blank.
The events are:
 Flight
 Ride
Ride Rental
 Train
Train Lodging
 Activity
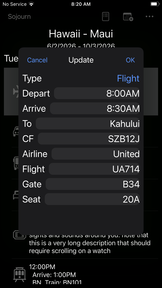
New/Updated event
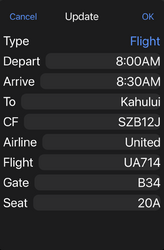
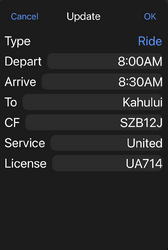
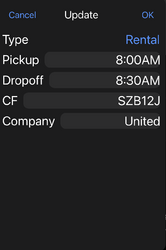
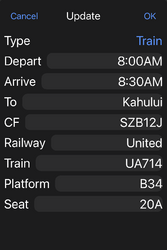
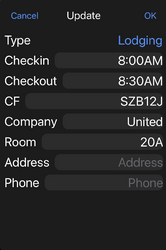
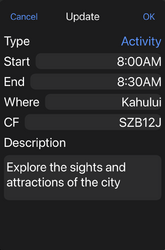
This popup creates or updates the events for a given day.
Note that the fields of the popup change depending upon
what type of event is being added
(or updated,
this same popup is used to update a
current event for a day).
Tapping on the Type field brings up
a drop down menu where you can select the
specific event type that is being changed.
The types are:
- Flight - plane trip
- Ride - ride share (think Uber or Lyft)
- Rental - rental car
- Train - train trip
- Lodging - hotel or airbnb
- Activity - sight seeing activity
Hopefully the fields that are shown for a
given type of event make sense for that event.
Note that all events have 4 common fields:
- Type
- Depart, Pickup, Checkin, Start - the start time.
Events for a day are sorted based upon this field so you really should get
it right.
- CF - an optional confirmation number.
- Notes - an optional field that can hold any information Sojourn
forgot to support. (This is the Description for an Activity)
New day
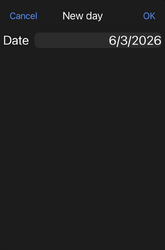
This popup create a new day for the trip.
The only field to change is Date,
the date of the new day.
Sojourn with suggest the day after the last
day in the current trip but it can be changed
to any date you want.
Save to file
Tapping on this icon brings up a system selection page.
Use this page to select a location and name
(it is highly recommended that you use
the suffix .json for the file name,
check out the section
Open by default
for an explanation of why this is helpful)
where a
JSON copy of the current trip will be saved.
When you tap on the save button in
the system selection page the file will be
saved.
If you decide to cancel this operation just
use the system back button to back out of
the selection page.
Load from file
Tapping on this icon brings up a system selection page.
Use this page to select a file that contains
a JSON representation of a trip.
Tapping on a file in the system selection page
will cause the data from that file to be loaded
into the Sojourn app.
If you decide to cancel this operation just
use the system back button to back out of
the selection page.
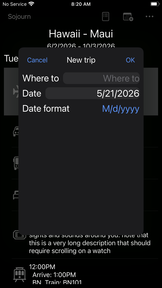
New trip
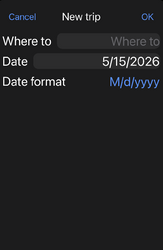
This popup creates a new trip.
The fields in this popup are:
- Where to - the name of the trip.
- Date - set the start date for the trip.
- Date format - drop down that allows the user to select
how dates are formated:
- M/d/yyyy - Month followed by day of month followed by year.
This is the default format.
- d/M/yyyy - Day of month followed by month followed by year.
- yyyy/M/d - Year followed by month followed by day of month.
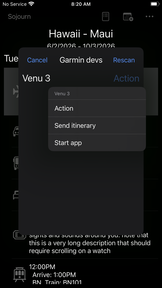
Watch
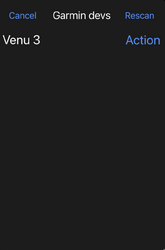
This popup sends the current trip to a
Garmin smart watch.
The popup will first show a list of watches
that are currently connected to the
device that Sojourn is running on.
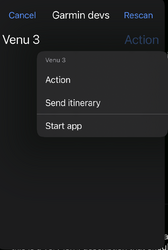
Tapping on the Action next
to that watch brings up the popup
that allows you to either:
- Send itinerary - send the itinerary to the watch
- Sart app - start the Sojourn app on the watch2
Note the Rescan button at the
top of this popup.
Scanning for Garmin devices requires
- Suspending the Sojourn app
- Spawning the Garmin ConnectIQ app
- Restarting Sojourn with a list of devices
Scanning can take a while and,
generally,
the list of watches connected to the
phone does not change so Sojourn
optimizes this operation.
The scan operation is only
done if there are no known
watches and then the result of the
scan is saved in persisten storage
on the phone.
Subsequent invocations of the Watch
popup will use the saved list of devices,
avoiding the scan.
If for some reason the list changes
(a watch is deleted or a
new watch is added)
tapping the Rescan button will immediately
do a scan operation,
finding all watches that are
currently connectd to the phone.
Note that sending an itinerary
to a Garmin watch requires a
rather delicate ballet between
the phone and the watch.
The Sojourn app on the watch
can only accept a new itinerary
when it expects one and the
Sojourn app on the phone doesn't
know the state of the watch.
Therefore,
the way to send an itinerary
is to:
- Start the Sojourn app on the watch
- Navigate on the watch to the Get itinerary from page
- Tap on the Phone app on the watch
- Go to your phone and tap on the Watch button on the Sojourn app
- Tap on the Action button for the appropriate watch
- Tap on the Send itinerary button
- Wait for the watch to show the new itinerary (be patient, it will happen)
(The process seems a little baroque when
written out but it's not that bad
in actual practice.)
Open by default
Sojourn installs itself as a handler for
json files.
As such,
if you use a .json suffix when saving trips
then Sojourn will be one of the apps
that can open that file.
If you open up the file manager
(or a cloud storage app like Owncloud
or Google Drive
or Dropbox)
and tap on a JSON file then Sojourn
will be one of the apps that can be
used to automatically open that file.
Footnotes
- I know, I should use the internationalizaton
support that's present in the phone itself but it turns
out that doesn't easily display dates & times the way
I prefer so we'll use this control variable instead.
←
- The utility of this command is a little suspect.
Since the request to open the app on the watch requires the
user to tap a confirmation dialog on the watch it seems a
little pointless,
the user could just as easily start the app
on the watch anyway but this seems to be the Garmin
approved way of doing things.
←